by rush-intely | Dec 22, 2023 | WordPress
Post Views: 2 In the dynamic world of web design, capturing your audience’s attention is crucial. A visually stunning website can make a lasting impression, and when it comes to creating impressive sliders and presentations, Slider Revolution 6.6.20 stands out...
by rush-intely | Apr 19, 2023 | PHP
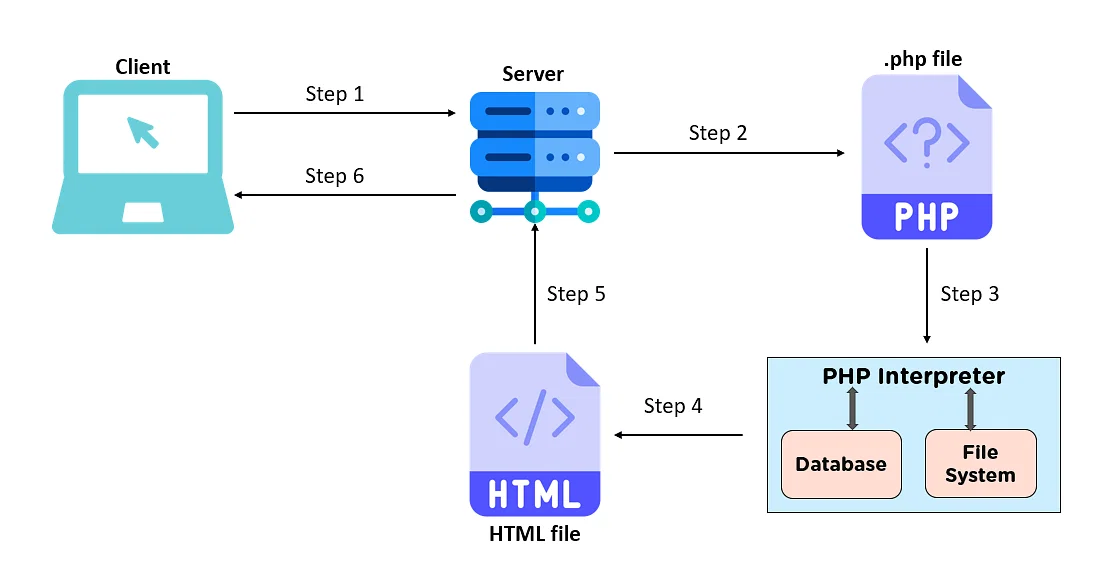
Post Views: 3 Introduction: Welcome to our blog on mastering PHP! If you’re new to web development or looking to expand your skills, PHP is an essential language to learn. PHP (Hypertext Preprocessor) is a widely-used server-side scripting language that powers...
by rush-intely | Mar 31, 2023 | WordPress
Post Views: 2 Lazy loading is a technique that improves the performance and speed of your WordPress website by only loading the images and videos that are visible to the user. This way, your site doesn’t have to download all the media files at once, which can...
by rush-intely | Mar 24, 2023 | WordPress
Post Views: 4 As a WordPress site owner, you may need to change the admin user of your website for various reasons, such as security or personnel changes. Changing the admin user of your WordPress site can be done programmatically using WordPress functions. In this...
by rush-intely | Mar 24, 2023 | React, WordPress
Post Views: 4 Combining React with a WordPress theme is a great way to create interactive and dynamic user interfaces on your WordPress website. React’s component-based architecture and ability to create reusable code make it an excellent choice for building web...
by rush-intely | Jan 17, 2023 | PHP
Post Views: 2 In PHP, there are two commonly used functions for checking the value of a variable: isset() and empty(). While these functions may seem similar, they have different behaviors and are used for different purposes. In this tutorial, we will be discussing...